Pages

30 August 2010

homemade waffles= YUM!

DH and I recently moved into a new home, and we finally have a patio! This was our first meal using our new bistro set out on the patio- perfect Sunday morning. This is the recipe that came with our GE waffle maker- I must admit, I'm rather a fan :)

MAKES:: 10 medium-sized waffles (may vary by waffle maker)

.:Ingredients:.
2 c. flour
2 TB sugar
1 TB baking powder
1 tsp salt
1 3/4 c milk
1/3 c vegetable oil
2 eggs

.:Directions:.
Combine dry ingredients. In a separate bowl, combine wet ingredients. Gradually add wet ingredients into the dry ingredients. Stir until just blended- do NOT over stir. Pour batter into waffle maker.

.:Notes:.
- Follow your waffle maker's instructions as to how much batter to add at once.
- We use spelt flour for a low-gluten option.
- If you over stir {aka. create too many bubbles} it will cause problems... I may have had my waffle maker sort of explode on me once- woops! Anyhoo, yea, there will be some bubbles from mixing, of course, but if there's a LOT, just let the batter sit for a little while until it settles down a bit.
- For a blueberry option, after pouring batter into waffle maker, sprinkle fresh blueberries on top! Note, this may cause the waffles to stick to the waffle maker, so putting a little olive oil on the maker before you start may be advised (check your waffle maker's instruction guide first though- not all models may advise using olive oil on the maker).

cross-posted on::
link par-tays at::

24 August 2010

moving, new home, coming soon!!

Some new home decor I posted up on my crafting blog! It was created for our Battalion Commander and his family as they're moving into a new home/moving from here to their next Army post. Check out the full post {here}


Coming Soon!!!
oh! and by the way! in about a month and a half, I'll be back in gear and posting regularly again! Thank-you to each and everyone of you who has stayed faithful and checked back here during my hiatus. I know I wasn't around very long before I had to take a break :-/ But I'll talk to you all again really soon :D *huggs*

10 August 2010

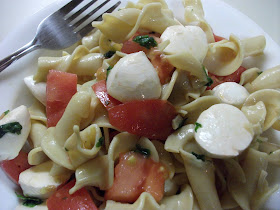
summer pasta

This is a favorite in our household! It's perfect for summer when you're looking for a light meal on those hot days, and when the tomatoes are in season. Take this recipe and make it your own- if you want more basil, add more! If you want more tomatoes, add more! This can be served hot as a main meal or cold as a side salad.

Recipe::
1 serving of pasta
~6-10 cherry or grape tomatoes
~6-10 small mozzarella balls
3-4 medium-sized fresh basil leaves
2-4 TB extra virgin olive oil
a few dashes of Adobo (optional)

Instructions::
Boil the pasta as indicated on packaging. I like to add some Adobo to the water to add a little extra flavor. While the pasta is boiling, cut the tomatoes and mozzarella into halves and mince the basil leaves. Drain the pasta and combine all the ingredients in a bowl and mix. I usually put everything back in the pot that the pasta cooked in- it softens the mozzarella really nicely. Serve and enjoy!


Notes::
- the pasta seen above are gluten-free trumpets, but feel free to pick any shape you wish!
- this is for a single serving- double, triple, quadruple, etc as needed!
- you can substitute 1 medium tomato (diced) for the cherry tomatoes
- you can also substitute 3/4 cup mozzarella (cubed) if you prefer buying the larger mozzarella balls, which I usually do as it's more economical
- although I prefer fresh basil leaves, you could substitute dried crushed basil- start at 1/8 tsp increase the amount to your taste preferences

cross-posted on:: Comestibilis

06 August 2010

peach sorbet

My husband and I have been on an ice cream kick lately, but we wanted to have a healthier alternative for our post-dinner snack. This is what we came up with!


MAKES:: ~4 servings
Ingredients::
2 peaches (pitted and sliced)
1-1 1/2 cups low-fat vanilla yogurt
2-3 TB agave syrup (optional)
2-4 TB fruit juice (optional)

Directions::
Put all ingredients in blender. Mix on "pureƩ" setting until smooth (30 seconds - 1 min). Pour into freezer-safe containers. Let sit in the freezer for 4-6 hours. Enjoy!

A Note On Texture::
To make your sorbet more creamy and less icy, take it out of the freezer every 1-2 hours and stir it up- this will break up the ice crystals and give you a smoother final product! Honestly, we don't have that kind of time and don't mind the ice crystals, so we don't mix ours.

{***notes***}
- we used peaches, but you can certainly substitute any fruit you want!
- agave syrup is an alternative to sugar. it has a low glycemic index and is naturally sweeter, so you use less than if you were to use sugar. if you don't have agave syrup on hand (or don't want to buy some just for this recipe), substitute with sugar. You'll likely have to add a bit more than the recipe calls for- just increase the amount of sugar in small increments until it reaches your preferred level of sweetness :)
- the mixture will seem pretty thin and should pour well into your freezer-safe container. that's ok!
- my husband used blueberry-cranberry juice (I did not). I used agave syrup (my husband did not). You can use both or neither, it's completely up to your taste buds!!

cross posted at:: Comestibilis

linked up at::

giveaways