Pages

25 February 2011

Crustless Spinach Quiche

Sorry it's been a while, ladies! Things are a bit crazy around here, but I'll be posting some more stuff soon!! Thanks for stickin with me ;)

So I usually don't like quiches since I don't eat eggs. I used egg beaters for this recipe and absolutely loved this!! I was pleasantly surprised :) I wanted something simple to make for breakfast whilst my in-laws were visiting. My MIL often makes a quiche when we visit them, so I knew they'd like it. This was fabulous! It's called a "tart" in my cookbook, but I use the term quiche- if anyone knows the technical difference between the two, please do let me know! :) So here is my vegetarian tweaked recipe! Original recipe is from:: Incredibly Easy Gluten-Free recipes

.: quiche ingredients :.
1 tsp olive oil
1 c. finely chopped onion
2 cloves garlic, minced
10 oz. frozen chopped spinach, thawed & drained
1 c. milk
3 eggs
1/4 c. grated parmesan
1 TB minced fresh basil OR 2 tsp. dried basil
1/2 tsp. black pepper
1/8 tsp. ground nutmeg

.: topping ingredients :.
2 TB grated parmesan


.: directions :.
(1) Preheat oven to 350 degrees Fahrenheit. Grease a 9-inch glass pie plate.
(2) Heat oil in skillet over medium-high heat. Saute onions and garlic. Stir in spinach. Spread mixture evenly into pie plate.
(3) Combine the remaining quiche ingredients in a medium bowl and gently stir until combined. Pour mixture evenly into pie plate. Bake 50 minutes or until knife inserted in center comes out clean. Sprinkle with the 2 TB parmesan topping.

.: notes :.
- I used Goya's extra virgin olive oil {that's essentially what we use in everything unless otherwise indicated!}
- I used 2% milk, as that's what we have in the house. I imagine any would type would work just fine though!
- As you can see in the photo, the spices all float to the top. Don't worry! That is how mine looked, and it tasted fabulous- not over spiced or anything :)
- I placed a cookie sheet on the rack below the rack that the quiche was on, just in case there's any overflow. The mixture pretty much fills a 9-inch pie plate to the brim, but I didn't end up having any overflow in the oven.

.: linking up to :.
Show and Tell Saturdays @ Be Different, Act Normal
Strut Your Stuff @ Saturday Mornings

17 February 2011

tomato salad

This is one of my newest favorite meals/appetizers/salads... it's super simple, super quick, and easy to scale for any size dinner or party!! This recipe came about as a combination of a caprese salad and cucumber salad. You'll see those two listed as "variations" below!

MAKES:: side dish for 2

.: ingredients :.
3 roma tomatoes
1/3 c. sweet onion
2-3 TB balsamic vinegar
1-2 TB extra virgin olive oil
Adobo {optional}

.: directions :.
1) Slice tomatoes into bite-sized pieces.
2) Dice onions.
3) Toss together onions and tomatoes in a large bowl. Drizzle with olive oil and balsamic vinegar. Add additional olive oil and balsamic to fit your taste buds :)
4) I like to sprinkle on a thin layer of Adobo {a garlic powder-based Latin spice}.
5) Chill or serve as is!

.: variations :.
- sprinkle with Italian seasoning, oregano, or other spices
- add about 3/4 cup of mozzarella, cut into bite-sized pieces. Garnish with fresh basil or sprinkle dried basil.
- substitute the tomatoes with 1 cucumber, and switch out the balsamic vinegar with white vinegar. Let marinate for 2-3 hours in the fridge to enhance the flavors.

13 February 2011

Tissue Paper Topiary Tutorial


Whew! Say that five times fast! Tissue Paper Topiary Tutorial... So I was the decorating gal for a recent Silent Auction event on-post, tight budget, so I made a few of the items... including the above topiaries! They're kinda an "in thing" right now, so I decided to try my hand at them :)

Our colors/theme was black & white damask & chandeliers with a pop of red. Although our family doesn't celebrate the holiday {everyday is "love day" in our home!} these would be great decor for a Valentine's Day theme too. So here's a {hopefully} pretty easy tutorial if you want to give them a go too!

Tissue Paper Topiary Tutorial

{Materials}
foam ball
wooden dowel
tissue paper {a lot}
hot glue gun {and lots of glue sticks!}
strands of beads
straight pins
ribbon
marbles/pebbles
sand
vase

{Step 1} Cut out roughly a bajillion tissue paper circles... I cut them out as I went along, so I wouldn't have too many left over, so I honestly don't know how many there ended up being. I took three sheets of tissue paper, folded them into quarters {so folded in half, and then in half again} and then cut out the circles. I played around with sizes when I first started, and settled on circles that were about 2.5-3" in diameter.

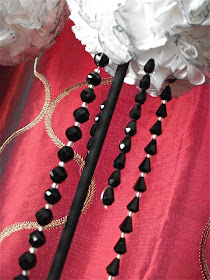
{Step 2} Take three circles, hold them at the center, then crinkle them {see above, bottom left corner of the photo}. This will be the center layer of your flower. Then take another three circles, hold them in the center, and kind of fold them around the "flower center layer" {see below}. The outer layer kind of naturally folds itself. It's not an exact science either, some of my flower outside layers were more "crinkled" than "folded," I just let them do their thing.

{Step 3} Add a nice big dollop of hot glue to the back center of your flower {where you were holding the flower}, push onto your foam ball, and hold for 10-20 seconds. You want to give the glue enough time to seep through all the layers of hot glue so that the flower center stays too. A few of my flower centers fell out- I just added a small dollop of glue to them and stuck them back onto their flower!

{Step 4} Repeat steps 1-3 until foam ball is covered :) I didn't like the look of the plain white {you can see I added in a few red flowers too!} so I took an ink pad and just ran it over my topiary ball. It inked up the edges of the flowers and gave it a nice two-tone look!

{Step 5} Paint a wood dowel and insert it into the vase. Then fill vase with marbles first then add in sand. This gave a very sturdy support base. I added some nice damask ribbon to top it off! You could also use foam for a support base, but since I used clear vases, I wanted something that looked nice and also would support.

{Step 6} These beads came pre-strung on fishing line. I tied the end of each line to a stick pin and then stuck the pin into the base of the topiary. My stick pins had little balls on the end, so it kept the line from falling off. If you use a regular stick pin {sans balls} then just add a tiny dollop of hot glue to secure the line to the pin after you're done tying.

{Step 7} Stand back and admire you're work :) You're done! I hope that wasn't too confusing... I'm a visual person, so I think the photos are more helpful than my word descriptions! If you have any questions, please feel free to leave a comment or email me and hopefully I can describe it better for you :)


.: linking up at :.
Newbie Party @ Debbiedoos
Strut Your Stuff @ Saturday Mornings
Favorite Things Friday @ A Few of my Favorite Things
Thursday Treasures @ The Treasurista
Making It With Allie @ What Allie's Making Now
Motivate Me Monday @ keeping it simple
Amaze Me Monday @ Dittle Dattle
Just Something I Whipped Up @ The Girl Creative
Craftomaniac Monday @ CraftOManiac
DIY Project Parade @ The DIY Showoff
My Crafty Weekend @ Until Wednesday Calls
Show Me What Ya Got @ Not Just a Housewife
Handmade Tuesdays @ Ladybug Blessings
Tip Me Tuesday @ Tip Junkie
All Things Inspired @ All Things Heart & Home
Catch A Glimpse Thursday @ A Glimpse Inside
Tip Junkie handmade projects

05 February 2011

hint o' cocoa bundt cake


So my first go at making a bundt cake went pretty well! This recipe is super moist and was a big hit with the family!

{dry ingredients}
3 cups all-purpose flour
1/4 tsp baking soda
1/2 tsp salt

{wet ingredients}
1 cup milk
2 tsp vanilla extract

{creaming ingredients}
8 oz unsalted butter
2.5 cups + 2 TB superfine granulated sugar
6 eggs

{glaze ingredients}
1/2 cup milk or water
2 cups confectioners' sugar


{instructions}
1. Preheat oven to 335 degrees Fahrenheit, placing rack in the center of the oven. Spray a 12-cup bundt pan with non-stick oil-and-startch spray {aka. grease and flour pan}.

2. Combine dry ingredients in one bowl and wet ingredients in another. Set aside.

3. Combine butter and sugar in a stand mixer with paddle attachment {or a large bowl and hand mixer} and mix on low for about 5 minutes or until light and fluffy.

4. Add eggs one at a time. Scrape bowl and mix until thoroughly combined.

5. Alternately add the dry then wet mixtures about a quarter at a time, without pausing between additions. Scrap the sides of the bowl and mix for another 20 seconds.

6. Scoop bater into prepared pan and bake for 50 minutes, or until the cake bounces back when lightly pressed and a wooden skewer inserted in the deepest part of the pan comes out clean.

7. Cool the cake in the pan for 5 minutes, and then flip out onto a rack and let cool completely.

8. Combine glazing ingredients and whisk. Drizzle mixture over cake. If it will not pour well, add more liquid as needed.

{notes}
- I used about 2/3 spelt flour and 1/3 gluten-free flour and it tasted fabulous!
- I will use less liquid in my glaze next time, or let it sit for a bit before pouring because it was really runny.
- I also added 1oz of cocoa to the dry ingredients to give it a hint of chocolate taste. Recipe also suggests adding 1oz melted unsweetened and 3oz melted bittersweet chocolate to the wet ingredients for more chocolate taste <-- will be trying that next time!
- As you can see, I also sifted some extra powdered sugar on top to make it look pretty ;)

{please excuse the stand mixer in the photos!}
original recipe is from: United Cakes of America


.: linking up at :.
I'm loving it @ tidy mom
show and tell saturday @ be different, act normal
newbie party @ debbiedoos
sweets for a saturday @ sweet as sugar cookies
craft o maniac monday @ craft o maniac
my crafty weekend @ until wednesday calls
motivate me monday @ keeping it simple
just something I whipped up @ the girl creative
market yourself monday @ sumo's sweet stuff
amaze me monday @ dittle dattle
strut your stuff @ saturday mornings