Whew! Say that five times fast! Tissue Paper Topiary Tutorial... So I was the decorating gal for a recent Silent Auction event on-post, tight budget, so I made a few of the items... including the above topiaries! They're kinda an "in thing" right now, so I decided to try my hand at them :)
Our colors/theme was black & white damask & chandeliers with a pop of red. Although our family doesn't celebrate the holiday {everyday is "love day" in our home!} these would be great decor for a Valentine's Day theme too. So here's a {hopefully} pretty easy tutorial if you want to give them a go too!
Tissue Paper Topiary Tutorial
{Materials}
foam ball
wooden dowel
tissue paper {a lot}
hot glue gun {and lots of glue sticks!}
strands of beads
straight pins
ribbon
marbles/pebbles
sand
vase

{Step 1} Cut out roughly a bajillion tissue paper circles... I cut them out as I went along, so I wouldn't have too many left over, so I honestly don't know how many there ended up being. I took three sheets of tissue paper, folded them into quarters {so folded in half, and then in half again} and then cut out the circles. I played around with sizes when I first started, and settled on circles that were about 2.5-3" in diameter.
{Step 2} Take three circles, hold them at the center, then crinkle them {see above, bottom left corner of the photo}. This will be the center layer of your flower. Then take another three circles, hold them in the center, and kind of fold them around the "flower center layer" {see below}. The outer layer kind of naturally folds itself. It's not an exact science either, some of my flower outside layers were more "crinkled" than "folded," I just let them do their thing.

{Step 3} Add a nice big dollop of hot glue to the back center of your flower {where you were holding the flower}, push onto your foam ball, and hold for 10-20 seconds. You want to give the glue enough time to seep through all the layers of hot glue so that the flower center stays too. A few of my flower centers fell out- I just added a small dollop of glue to them and stuck them back onto their flower!

{Step 4} Repeat steps 1-3 until foam ball is covered :) I didn't like the look of the plain white {you can see I added in a few red flowers too!} so I took an ink pad and just ran it over my topiary ball. It inked up the edges of the flowers and gave it a nice two-tone look!

{Step 5} Paint a wood dowel and insert it into the vase. Then fill vase with marbles first then add in sand. This gave a very sturdy support base. I added some nice damask ribbon to top it off! You could also use foam for a support base, but since I used clear vases, I wanted something that looked nice and also would support.

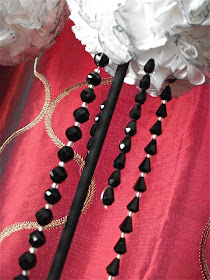
{Step 6} These beads came pre-strung on fishing line. I tied the end of each line to a stick pin and then stuck the pin into the base of the topiary. My stick pins had little balls on the end, so it kept the line from falling off. If you use a regular stick pin {sans balls} then just add a tiny dollop of hot glue to secure the line to the pin after you're done tying.

{Step 7} Stand back and admire you're work :) You're done! I hope that wasn't too confusing... I'm a visual person, so I think the photos are more helpful than my word descriptions! If you have any questions, please feel free to leave a comment or email me and hopefully I can describe it better for you :)

.: linking up at :.
Newbie Party @ Debbiedoos
Strut Your Stuff @ Saturday Mornings
Favorite Things Friday @ A Few of my Favorite Things
Thursday Treasures @ The Treasurista
Making It With Allie @ What Allie's Making Now
Motivate Me Monday @ keeping it simple
Amaze Me Monday @ Dittle Dattle
Making Monday Marvelous @ c.r.a.f.t.
Just Something I Whipped Up @ The Girl Creative
Craftomaniac Monday @ CraftOManiac
DIY Project Parade @ The DIY Showoff
My Crafty Weekend @ Until Wednesday Calls
Tute Yourself Tuesday @ Little Eme
Show Me What Ya Got @ Not Just a Housewife
Handmade Tuesdays @ Ladybug Blessings
Tip Me Tuesday @ Tip Junkie
All Things Inspired @ All Things Heart & Home
Catch A Glimpse Thursday @ A Glimpse Inside

That is too stinkin cute for words! How fun and easy! Thanks for joining in on the newbie party...have fun. XO
ReplyDeleteI LOVE your style! So clean and classy! These are GORGEOUS! I'm your newest follower!
ReplyDeleteHi Shauna visiting from Debbie's, a great tutorial thanks for sharing. I'm now following.
ReplyDeleteThis is REALLY cute! I love it!
ReplyDeleteWill be featuring it tomorrow!
Thanks for linking up to Making It With Allie! I can't wait to see what you have for next week!
AllieMakes.Blogspot.com
I love your topiarys!! Great job, and very inventive!!
ReplyDeleteI'm visiting from Debbies party!
xxDaniella
This is SO CUTE! I found you over at Debbie Doo's Party! I am your newest follower!
ReplyDeletehttp://mycreativeescapes.blogspot.com/
Carrie
Love this! Great tutorial! I would love for you to link up to my Ten Buck Tuesday link parties!
ReplyDeleteI'm your newest follower :)
www.youngnester.blogspot.com
Wow, that is great, I love how the ink made it look... What creative decor on a budget!
ReplyDeleteladybirdln.blogspot.com
Looks fabulous! Love the added red flowers. Thanks for linking up!
ReplyDeleteSo fabulous! Love the red!! What a great project!! =)
ReplyDeleteLove this DIY project will be posting on my blog...but of course crediting you for all your hard and creative work.
ReplyDeleteThis comment has been removed by the author.
ReplyDelete