30 January 2011

weekly chore tracker

So my craft room is still under construction, so I haven't been able to share more photos with you, but they'll be coming soon!!

Meanwhile, I figure I'd share some of my lists with you :) Above is my weekly chore tracker... well, one of them... I have a tiered system, which I'll explain, and then share examples of over the next few days!

So I split up each of my days- the top are things that I do everyday, the bottom are chores that vary daily. Where it says "cleaning," I have a separate list that I refer to that has my cleaning chores for each day, since there are a few of them. I'll share that list with you tomorrow! The rest of the items are- working on my thesis, business related things {making cards, working on orders, etc} and OSC, a volunteer organization for which I'm the treasurer.

Most of the varying chores are self-explanatory... Monday I switch out washcloths and pillowcases, Thursday I switch out bed linens, kitchen hand towels, washcloths, and bath towels. This is my first round of setting up a cleaning schedule, so it could very well change in the future if I find that some chores need to be done more frequently or work better on a different day.

Below I've included a blank printable version of my chore chart and also one of my previous chore charts, which might work better for some people. It worked well for me when we had a smaller apartment which didn't require as much cleaning, and also while DH was deployed and I didn't have as much going on at the time. Please let me know if you'd like a personalized version- I'd love to create one for you!!


.: linking up at :.
Amaze Me Monday @ Dittle Dattle
Just Something I Whipped Up @ The Creative Girl
Strut Your Stuff @ Saturday Mornings
Marketplace Monday @ Finding Fabulous
My Crafty Weekend @ Until Wednesday Calls
Motivate Me Monday @ Keeping It Simple

26 January 2011

bathroom cleaning & crafting

So here's a recent project I wanted to share with you! It started with the above "ingredients"... baking soda, vinegar, label maker, and old containers. It ended with what you see below!

Here's the backstory... in recent months I switched over to using just straight vinegar and baking soda to clean our toilets {well, our whole house really!} You can see my post {here} about all the awesome uses for baking soda around the house, and {this article} for awesome uses for vinegar! Anyhoo, so using little dixie cups to sprinkle the two around the toilet bowl just hasn't been working the best. So I took two old containers, added some scrapbooking paper and mod podge, and there ya go! I was originally going to use the label maker, but the old containers were hanging onto their stickers pretty well, so I decided to cover them up instead of spend the extra time removing them.

Feel free to take a peek at my blog post {here} on my crafting blog to see a bit more of the process for crafting the fun labels and why I stamped "merry & bright" on them... :)

So above are the "ingredients" that I use for cleaning our bathrooms.... my new baking soda and vinegar containers which I use for cleaning out the toilet bowl, the bigger bottle of vinegar and the white rag for wiping down surfaces, the blue microfiber for dusting, and the tan rag is for wiping down the toilet lids and seats with vinegar. Even though vinegar kills 99% of germs, I'd rather keep my toilet rag separate from my sink rag ;) I have toilet bowl brushes in every bathroom, so those coupled with my above arsenal get the job done!

So that's my bathroom cleaning collection! Do you have any neat tricks for cleaning??

.: linking up at :.
Works for Me Wednesday @ We are THAT family
All Things Inspired @ All Things Heart & Home
Whatever Goes Wednesday @ Someday Crafts
Show and Tell @ Blue Cricket Designs
Show Me What Ya Got @ Not Just A Housewife
Strut Your Stuff @ Saturday Mornings
Weekend Wrap Up Party @ Tatertots and Jello

22 January 2011

craft room redo: part 1


So the past week or so I've been completely redoing my craft room. I'll share with you over the next week or two how I've been reorganizing and rearranging!! I'll start with one of the more simple redo's in the room, but has a huge impact! I found some fabric that I LOVE and I needed to hide some of the functional yet unsightly organizational pieces that are under two of my crafting desks.

Enter, the table skirt! Now I did a super simple version because we'll be moving in a few months, so I didn't want to spend a lot of time making skirts for this particular room layout, since I may not even have a craft room in a few months!! Anyhoo, I simply cut the fabric down and added some sticky-back velcro, and voila! Instant table skirt :) I intentionally didn't wrap the fabric around the entire side of the table on the right since the heatduct is under that edge of the table- don't want to block the heat, considering the current temps are in the negatives this weekend!!

Now if I had a permanent crafting room, I would have folded over and sewed the edges {as you can see, there are small frays here and there}, sewed the velcro to the fabric for some extra strength, and included a split down the middle of the skirts to make easier access to the tools underneath. I probably would have added a ribbon border at the top edge too.

I hope you enjoyed this little transformation, and I look forward to sharing more with you soon!!! :D


.: linking up to :.

16 January 2011

froggy shower printables

Here are the two printables I promised you! Click on the titles to be taken to the download site.

The first is the two shower games I put together. I found the first idea online and switched out a few of the starter words and made it all pretty. The second one I used Puzzle Maker to create the word search, then made it all pretty :) That site is pretty sweet- has tons of types of puzzle it can make and all for free!

I made the little froggy image myself- I couldn't find one online I liked, and I didn't have a stamp I could use. Let me know if you'd like the games but with different colors or images!! I'd be happy to edit and send it to you :)

15 January 2011

froggy shower

So I'm wicked bummed that most of the photos didn't turn out.... so bear with the poor photography, but I wanted to share some cute ideas from a baby shower a few of us wives recently threw for our friend who's expecting a boy in May! Again, please excuse the poor photos, but hopefully you can get some fun ideas out of it!! :)

.: Food :.
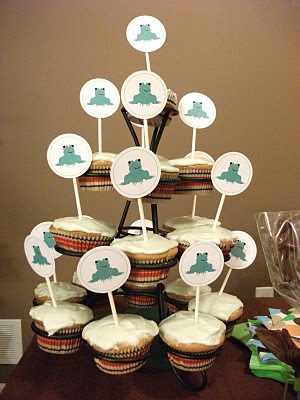
We catered the event from one of our favorite local Mexican restaurants. For dessert, fondue was on the menu, so I personalized bamboo skewers for us! I also went with cupcakes {not my best work, I was short on time!} but I made little froggie toppers for them! I'll get you the printables for them soon ;) And I used those for nametags for our glasses too! I just added an eyelet and some ribbon!

.: Guestbook :.
I just whipped up something SUPER simple- cut out pieces of paper, rounded the top edges, put eyelets on the front and back pages and threaded some ribbon through and added a charm. The inside pages, I stamped a journaling stamp so we could each leave her some advice or congrats, I also added some coordinating scrapbook paper along the top of each page. On the inside of the back cover, we each wrote down our predictions for date, size, and weight of the baby, so it'll be something fun momma can look back on- see who was closest!

.: Decor :.
Well, I kept it simple. They're moving to GA this week, so we didn't want to get them too too much. I made a small diaper cake {topped with a washcloth... do you know how hard it is to find froggy-themed stuff?!}. In the background, to the left of the cake, you can see we did a wishing well- everyone brought their gifts unwrapped and we added it all into a baby tub :)

.: Games :.
Well, for a door prize, I added some scrapbook paper to clothespins, and then hung baby socks up on some twine. I used my PTI bookmark die, and then cut them shorter to fit in the socks, and added some ribbon to the top. On each "bookmark" I wrote a date. Whoever pulled out her due date won the prize!
I also did two other games, I'll get you the printables for them soon ;)

.: Favors :.
This was a last minute party {since she was moving in a week!} so I decided to keep the favors simple. I went with a small candy display- everyone grabbed a bag and filled it with their favorite candies! For the bag tags, I used my PTI bookmark die & embossing plate, added a sentiment, gems, and froggie, then tied them to the bags! Super simple but cute, I think :) This might have been my favorite piece that I made!!

I hope you enjoyed and got a few ideas for your next party!!! :)

10 January 2011

metamorphasis tea

.: BEFORE :.
So, imagine, if you will, three kitchen cabinet shelves full of boxes and tins of tea, stacked and crammed in whatever way they can fit, haphazardly shoved in wherever there's room.... well, that was my cabinet. I didn't get to take a photo, unfortunately, but trust me, it was ugly!


.: AFTER :.
What you now see before you (well, below, really) is our newly revamped kitchen cabinet! We have a TON of tea. Both DH and I love us some tea, pretty much every kind of tea too, so between us, we have a boatload of tea. So, let me take you on a tour....

Yup, that's our cabinet! I'm a bit proud, I'll be honest :) And it's been that way for over a month now, so I'm quite pleased that it's withstood the test of time. I think that's the real organizational test... if you can actually maintain the organization, then that's a pretty good bet that it's a GOOD organization method :)

Anyhoo... I started by emptying out the cabinet. It covered about half of our counter, and we have a fair amount of counter space! I'd been saving the clear plastic containers that we get our bulk foods in, and they came in quite handy when redoing this space. Our very top shelf (only pictured above) has our surplus boxes of tea {usually I'll grab one of those boxes when we travel and toss it in my bag} and our hot chocolate tins. Then the middle shelf....
We have four plastic containers that fit perfectly around the lil white wire shelf. The top two containers hold my green and black teabags. The bottom two containers hold my white and red tea bags. Then there's two tea tins {please note the "Official Unbirthday Tea"- it's an Alice in Wonderland themed tin from Disney, hehe, it's a green tea, love it!}. You can see in the first photo that there's also some more tins and boxes off to the right. They're less frequently used and stacked nicely, so I decided to leave them be.... then we move to the bottom shelf....

I've had these lil containers floating around doing various jobs throughout the years. They're per-fect for holding tea bags! Just the right size- love it! The left two containers are all DH's teas. The right container has "our teas" {ones that we both like}- Numi's puerh teas and Tazo's Passion tea, an herbal fruity tea.

My favorite tea? Well it's actually in a tin on the counter. It's Wegman's loose leaf decaf British Breakfast. I usually have a least one {if not a few cups} a day, so it gets a special place of prominence outside of the cabinet.... ok, so it's not really a "special" place, it's wedged in between the sugar canisters and the utensil holder, but point being, it's out all the time since I use it so much ;) Anyhoo, I hope you enjoyed our journey along my tea cabinet. Thanks for reading, hehe!

.: linking up here :.
Metamorphasis Monday @ Between Naps on the Front Porch
Whatever Goes Wednesday @ Someday Crafts
All Things Inspired @ All Things Heart And Home
Get Organized Party: Kitchen @ Domestically Speaking
Simplify for the New Year @ A Home Made by Kiki

07 January 2011

frugal JOY

Here's a quick and frugal gift, and you could personalize this for any celebration or holiday. Give as a birthday gift and spell out the recipient's name. Make a set for each season: "summer" "autumn" "winter" "spring" to use as home decor. There are so many possibilities!!

So I made this as a gift for my MIL this year. It came together pretty quickly- cut out the letters {I freehanded them, but next time I'll bring out a font and trace}, distressed the edges with some tearing and ink, added the sentiment stamp, the snowflake and button, a few embellies and done!

I splurged on some nice frames, but they were at 50% off so they were still only $5 each. So combine that with the cost of the individual scrapbooking supplies I used, and this ended up totaling maybe $8 at most!

06 January 2011

diy fabric trees


so I know this post is a little late for Christmas, but I figured I'd share some projects I didn't get a chance to post during the crazy busy holiday season!

You could totally customize these as decor for a party, using the colors of your party theme, or make some for each season of the year, customizing the colors- pastels for spring, muted earth tones for autumn, etc.

I had some extra fabric scraps left over from making our family ornaments this year {photos to come!} and I didn't want to throw them out. I had bought a few styrafoam trees so I figured this would be a perfect use for those scraps!!


.: materials :.
fabric "ribbon" scraps
styrafoam tree
ribbon {for bow}
straight pins

.: steps :.
1) cut fabric "ribbons" 1 inch thick and length... about 1.5-2 times the circumference of the tree your using. This will give you enough extra fabric to make the ruffles.
2) use two pins to attach your first ribbon to the tree, starting at the bottom. I used one pin at each corner {one towards the top of the tree and one towards the bottom}. This will end up being the back of the tree since the bottom pin heads of each row will be exposed once you're done.
3) every 1-1.5" crimp the fabric and use a straight pin to hold in place. I only used a pin at the top of the fabric {the edge closest to the top of the tree} because I'd found that using a pin at the top and bottom didn't look right or give a nice ruffle look.
4) continue crimping until you reach back to the beginning of your fabric and secure with a pin or two
5) repeat for each row moving towards the top of the tree, overlapping each row about 1/4-1/2"
6) before I did the last row at the top, I cut two short "ribbons" of fabric and crossed them over the top of the tree. then I finished the top row with the crimping.
7) I cut a few pieces of ribbon and draped them over the top of the tree, securing them with a pin.
8) then to top it off, I made a bow and secured it to the top with a pin

I hope that made sense- if not, shoot me an email and I'll try to give a more detailed description and take a few more photos!

.: linking up at :.
Strut Your Stuff Thursday @ somewhat simple
Crafty Soiree @ yesterday on tuesday
Whatever Goes Wednesday @ someday crafts
All Things Inspired @ all things heart and home

01 January 2011

holiday planner printables {again!}

Although a bit late for this year, here's one of the final sets of printable that I have in my holiday planner! If you click on the "Holiday Planner" button in my right sidebar, you can view all of the printables I have posted thus far, and I will post more there in the future too! Oh yes, and...

Happy New Year's!!!


Gifting Lists {to keep track of what sizes friends & family wear, their favorite colors, etc}